Friday, 21 October 2016

Beginners Guide To Pole Fishing – Part 5 - Rigs and Hooklengths


Rigs – an essential part of pole fishing. You have two choices. Buy ready made rigs or make your own.

Ready Made Rigs
Probably the easiest way for a beginner to start. But you have to be careful, there are good and bad. And are they the right tool for the job? Bear in mind that a ready made rig will already be shotted and most likely have a hooklength attached. So you have to ensure that what you buy is actually what you need for the venue you are going to fish.

Stick to a major brand such as Drennan who's rigs are made with the AS (Alan Scotthorne) floats or Daiwa & Shakespeare, equally good names.

You can get custom made rigs tied to order. Just search the internet for “hand made pole rigs” or “custom pole rigs” to find some suppliers.

Most ready made rigs come on a huge length of line. Unless you are fishing a ridiculously deep water the rig will need to be cut down before use.  I will explain how much when we finally get fishing.

The one thing that puzzles me about ready made rigs is what you do with the bits when the rig gets too short or is trashed. You can't just throw the float and hooklength away surely.  Not surprising therefore that as a pole angler of long standing I of course make my own. 

Making Your Own Rigs
What You Will Need -
 
Floats – Discussed in part 4
 
Silicone Tubing – I buy from eBay and use 0.5 and 0.7mm
 
Line – See below
 
Shot – Discussed in part 4
 
Hooks/hooklengths – See below
 
Winder – Just make sure you buy winders long enough to take your chosen floats.
 
Anchor – Available from all tackle shops.
 
Loop Tyer/Sizer - Optional

Line
Most if not all pole anglers will use a “high tech” line. These lines are also known as pre-stretched. They are a thinner diameter for the same breaking strain than those used for reel lines. Being pre-stretched they are, in material science terms, brittle and less robust. The elastic in the pole provides the shock absorption required to prevent breakages.
 
You will find that when anglers talk of lines traditional mono used on a reel is usually referred to by breaking strain, high tech lines tend to be referred to by diameter.

I use Preston Reflo Power for no other reason than it is what my local tackle shop sells. I am aware that if you do your own measurement that this line is around 0.02mm thicker than stated on the label. I take the stated diameter as a guide not an absolute.

Two simple questions for me - am I getting bites and am I loosing fish? If I am not getting bites I may need a thinner line, if I am having fish break me then I need thicker.  What I want is the balance between the two, the diameter number I use therefore is almost irrelevant. Its a bit like knowing I am comfortable in an XL tee shirt. I really don't care what the measurement of chest size XL is supposed to be.  But I know it is smaller than XXL and larger than L.

Choose your favoured or available line and learn how to use it.

Hooks
These will very much depend on what type of fishing you are doing and personal preference. I would suggest that wherever possible people will use spade end hooks though eyed have their place with heavier lines. This is because it is more difficult to get a secure whipping on a spade end hook with thicker lines.

For this reason I use spade end hooks with Reflo Power 0.13mm and eyed hooks with line thicker than that.

Spade end hooks being a little lighter can aid getting a better presentation. A small difference but can be vital when targeting silvers.

I can only really talk about the hooks I use and will list them and the lines they are teamed with just as a guide. For further options I suggest asking on a forum like maggotdrowning.com.

Commercial Fishery (barbless)
Kamasan B611, spade end size 16 with 0.13 Reflo Power, size 18 with 0.10. Bait – soft pellets, corn, maggot, meat

Kamasan B911, eyed size 16 with 0.17 – hard & soft pellet, corn, meat

Canal Silvers (barbed)
Sensas 3050, spade size 20 with 0.06 – bread, maggot, pinkie, squatt, caster

Kamasan B511 size 18 with 0.08 or 20 with 0.06 – caster, maggot, pinkie, squatt

River (barbed)
Kamasan B511 size 18 with 0.10 – maggot, caster, hemp, worm or 16 with 0.10 specifically for hemp

If I feel I need a stronger hook and line combination on the canal for targeting tench, bigger bream or even carp I will turn to my commercial carp hooks/line.

Hooklengths
I have settled on two lengths of hooklength but this is a subject that divides opinions amongst pole anglers. Everyone has their favoured length. Sometimes this will be species dependant. Again I will state what I do.

Most of the hooklengths I use, and I make my own, are ten inches. I like this length for a few reasons, but I cannot state for certain that my reasoning is sound or makes a difference.

First it gives the last twenty inches of the baits fall hopefully as natural a look as possible. As I never put shot on a hooklength it keeps the last dropper shot above the eyeline of the fish. It allows me to go up to nine inches overdepth without affecting the shotting. I also think it allows the bait to act more naturally when settled as a passing fish can waft it more easily than were I to have shot closer.
 
I will use this length on both commercials and rivers. I also use it on canals where I want to fish with a few inches of line on the deck. Useful I feel when the canal may tow due to a lock opening.

The other length I use is four inches. I reserve this mainly for fishing at dead depth on a canal or stillwater silvers fishing. I really can't justify my choice with logic here. Its just that I have succumbed to the theory that the shy bites you may get mid-Winter from roach on a canal may show up better with a short hooklength. I combine this with a heavy final dropper like a No.9 who's movement I think will have a greater effect on the float.

I also use four inch hooklengths on commercials when specifically targeting F1 carp. I have to admit that I don't get on well with these fish and thus follow the advice of the experts who tell me shorter hooklengths are the way to go.

Having given this subject some thought while writing this I do wonder if the length of hooklength I use may be influenced by the way different species actually take the bait.  Roach are a darting type fish.  By this I mean they are very mobile and move around a swim quickly.  Just as quickly they can, I believe, take and reject a bait but are constantly moving, particularly on stillwaters.  Carp on the other hand tend to graze or grub about sucking in food and thus hookbait without moving far, and not quickly. 

I think therefore that the shorter hooklength works for roach because they move the final dropper while carp actually pull the rig down when sucking in a bait.  But don't ask me about F1s because these fish still baffle me!

Making Up Rigs
This may seem like a simple task to some but I'll go through it just in case anyone isn't sure.

First thing we need is a length of line but how long? You don't want to waste line but on the other hand you don't want to be caught out with rigs that are too short. In my blog on my simple approach to pole fishing I detail the lengths of rigs I make for commercials. In the main this is decided by the float and the rig's intended use. The following is a simple run down, lengths are without hooklength.
 
4 foot – for margin or up in the water fishing with a dibber or 0.2g short float

7 foot – for full depth fishing as most commercials are between 4 & 6 foot deep, float will be 0.5g 
 
10 foot - for deeper commercials or days when the weather is poor when I need a heavier float, 1g and heavier floats.
 
My canal rigs are four and six foot as the Grand Union that I fish is only a maximum five foot deep and regularly I am looking to fish just in just 3 foot of water up the far shelf.

Rivers I make rigs of seven and ten foot with appropriate floats.

The way I make my rigs is as follows – cut a length of line and tie a loop with an figure of eight knot at what will be the top end. Thread on the float followed by three short lengths (3-5mm) of silicone tube. The silicone should be snug on the stem but not overly tight. Three pieces for two reasons. First, if one breaks you still have two. Also having three means that the stem will not bend as easily when moving the float on the line. Important if you use wire stemmed floats, then even four pieces of silicone may be advisable. The silicone is then threaded onto the stem with one piece at the very bottom, one just under the float and the other midway. 

The silicone just under the float is not tight to the body but around 1cm down the stem.  This reduces the angle the line makes around the float body and thus reduces the pressure that cuts the line into the body when playing a fish.

If using an olivette either add the inline olivette now or the two pieces of silicone that will hold a pronged version in place.

I now tie the bottom loop. I think it is worth taking the trouble to use a loop tyer or sizer to get consistent sized loops.

Whether you add shot at this point or wait until you get to the bank is up to you. I add the shot when I make the rig. But as I know my floats and what shot they will take plus I know what shotting pattern I am going to use most of the time it saves time on the bank. And I always struggle to set up in time for a match so saving minutes is vital to me.

Shotting and shotting patterns will be discussed in the next section.

Whether you add a hooklength at home or on the bank is up to you. I do both. Because of the limited range of hooklengths I use I know what will go on the rig and so will add some hooklengths and take other rigs without. Again a bit of a time-saving ploy.

Once done you can store your rig on its winder. You will see that most winders have a shallow and deep side, the float needs to sit on the deep side. May be obvious to some but …..  Anchor in place and if necessary mark the winder with the rig's details. Trust me you will not remember what is on what winder unless, like me, you use a limited range of rigs and use the winder colour to identify them.


A typical rig selection for a day on a commercial.  Actually several days.
 

Light blue  - 0.2g float on 4ft of 0.17 line
Dark blue - 0.5g float on 7ft of 0.17 line
Yellow - 1g float on 10ft of 0.17 line
Green - 0.5g float on 7ft of 0.17 line (thinner & longer bristle than the dark blue)

You don't NEED loads of variations in order to catch fish.  I do have some other rigs that get swapped in for specific venues or time of year.  These are explained fully on my simple pole fishing post.  But I would be comfortable going to almost any commercial water in the Summer with this set of rigs.

And the same for my canal rigs.
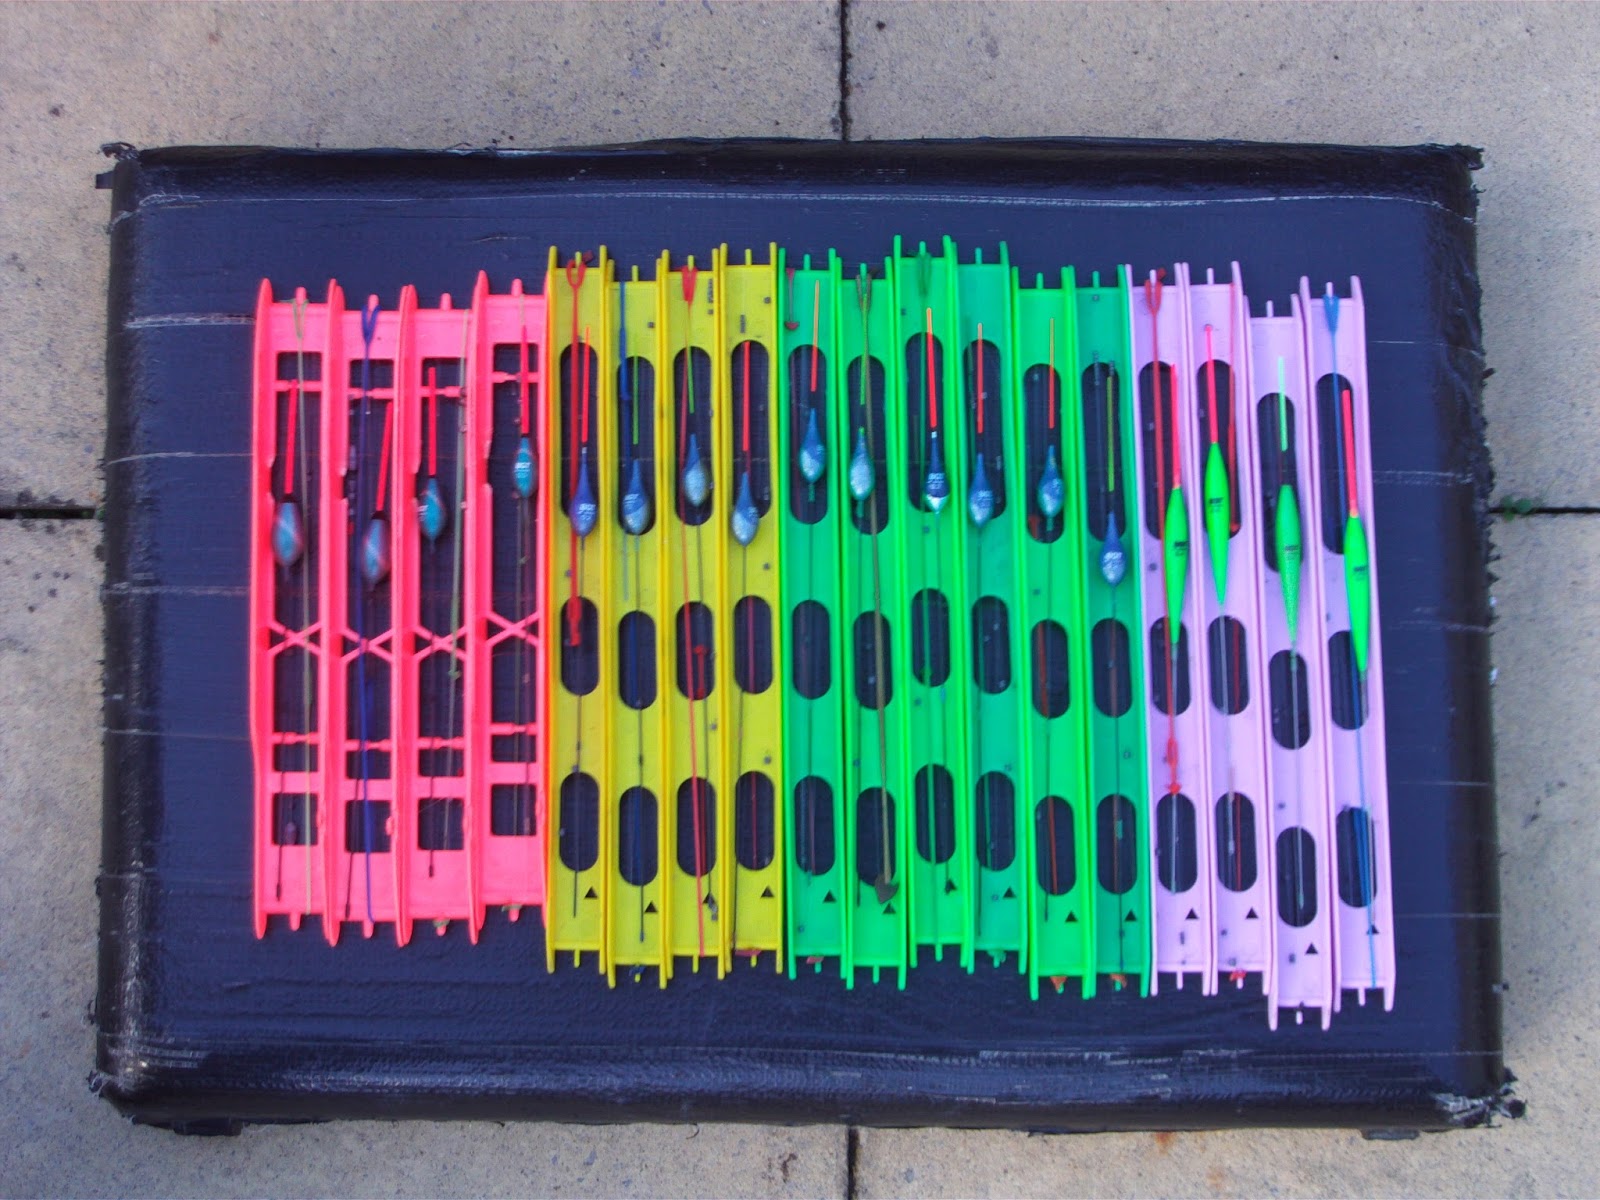

All on 0.11 line
Pink - 0.5g and 1g floats on 6ft of line
Yellow - 0.2g on 4ft
Green - 0.2g on 6ft
Lilac - 0.4g on 6ft


Monday, 17 October 2016

Beginners Guide To Pole Fishing – Part 4, Floats & Shot

It is an old saying that floats are designed to catch anglers not fish. This is never more true than when talking of pole floats. To the beginner the array of patterns, sizes, colours, loading and materials is bewildering - and tempting. There is absolutely no need to try and buy or use every different combination. As I have discovered you really can get by with a very small range of floats.

Hopefully I can guide you through the maze so you can fish your chosen floats with confidence.  Once you have become comfortable with the pole you can then, if you wish, expand your float collection

Consider that floats do two jobs. Holding up the bait and indicating bites. Every float will do this. So to a small degree it doesn't matter what it looks like or is made from. The time for refinement will come once you have some experience fishing the pole.

Before I get onto the actual float I think it worth taking a detour to talk about the weights we use with the float.

Shot, Stotz, Styls and Olivettes


Shot
Hopefully we all know the traditional round shot. Numbered 13 to 1 with the weight getting bigger the smaller the number. Larger than a size 1 we then get into letters BB, AA, and SSG (swanshot). For most pole fishing applications we will use nothing larger than a No.6. And for some even that is a no-no, 8 or 9 being the largest they will use.

I will mention at this point that in England it is illegal to use pure lead in any fishing shot/Stotz/Styls heavier than a No.8.

Because pole fishing is all about finesse and accuracy the tiniest shot, 11, 12 & 13 are used frequently. They help get a float shotted precisely as the angler wants. The trouble is that these tiny round shot are a devil to get on the line. Being round they roll away from where you want them. This problem was solved, certainly for me, with the invention of Stotz.

Stotz
The brand name for the Preston Innovations alternative to round shot. They are extruded and cut producing a rectangular, almost cubic shape before being squeezed on the line. Because of their shape they don't roll. Handling becomes easier thus encouraging the use of the smaller sizes in perfecting shotting of pole floats.  Before Stotz became available I gave up trying to use 12 & 13 shot.  Now I use these sizes of Stotz regularly.

Stotz are numbered exactly the same and are interchangeable with shot. It is just the shape that is different. So when you see numbers referring to shot sizes they apply equally to Stotz.

Other manufacturers have now followed on and produced their own version of Stotz. But the idea is the same.

Where later I refer to shot I will mean both shot and Stotz, which you use is personal choice. But I will say that since using Stotz I have never gone back to shot.

Styls
Styl weights were first used on the continent, possibly France or Belgium. Like Stotz they are extruded and cut to length. But the numbering is totally different as is the weight of the individual pieces compared to shot.  Styls are also thinner and longer than Stotz.  As far as I am aware all styls are pure lead being made primarily for the continental market where lead is not banned.

Styls are numbered 1-20 and get heavier the higher the number. But note that sizes 1-6 are rarely used as they are less than 0.01g and sizes 12-20 are illegal in England/UK. So generally we would see only sizes 7-11.

The shotting capacity of most pole floats tends to be marked in styls. This is a carry over from the floats having originated on the continent.

Any difficulty handling either styls or Stotz can be overcome by using either styl pliers or a similar tool made for Stotz.

Float Shotting Capacity Markings
The majority of pole floats will be marked “4xNN” where NN is the size number of a styl so the marking indicates the float's capacity as four of a certain size of styl. Normally only the even styl numbers are used.

The following is a very rough indication of the gramme equivalent of standard styl markings.

4 X 11 = 0.1g

4 X 12 = 0.2g

4 X 14 = 0.4g

4 X 16 = 0.6g     (Actually its 0.5 but that doesn't fit the pattern)

4 X 18 = 0.8g

4 X 20 = 1.0g

You should be able to spot the simple rule of thumb the above list reveals.

Some pole floats will be marked in grammes so you will see markings like 0.2, 0.5, 0.75 and 1.0.

I have known of some makers of handmade floats to mark their products in shot. But this will normally be obvious or the maker will tell you when you buy.

One important thing for the novice pole angler to understand that these markings are NOT an indication of how the float should be shotted. They are just an indication of the total shotting capacity of the float. What actual weights you use or what sizes and shotting pattern is up to the angler.

I will discuss shotting patterns in a future section.

Olivette
French for small olive and that gives away their shape. These are weights used in place of shot to provide a compact bulk. Attached to the line either by the line passing through or using two silicone sleeves to trap the olivette by way of two prongs sticking out top & bottom just like a pole float stem.


In line olivettes.  Usully trapped in place with shot above and below. 
Very thin and short lengths of  bristle pushed into the hole can be used also.  
 

Although they can be used in sizes down to 0.2/0.4g I would venture to suggest their main use is on floats of 1g and more in deep water.

The olivette will be much smaller than an equivalent shot or string of shot thus will sink more quickly due to the reduced drag.

Pole Floats

Strictly speaking you can use just about any float on a pole. When I refer to pole floats though I am talking about the accepted bristle topped or dome topped floats made specifically for pole fishing.

Because the variations and range of floats available is large and this is a beginner's guide I am not going to try and explain all of them.  As you develop and learn so you will discover what you prefer and what works on your venues.

Do not get tempted to buy a vast range of floats in different sizes. Start with one or two patterns in a couple of sizes and go from there. When I say sizes, I see little point in having floats that are just 0.2 grammes different in weight. 0.5 and 1 gramme floats will cover most situations. If targeting silvers on a lake up to four to five foot in depth or a slow moving, shallow canal then some floats of around 0.2g may be suitable. For fishing up in the water or margins then shorter dibber type floats are an advantage.

There is an accepted rule of thumb that for still waters like lakes and canals your float should carry 0.1 gramme per foot of depth. This is a guide and not an absolute. I will happily use a 0.75 gramme float in four foot of water if the water is flowing like a canal when the lock gates open. 0.2g in five or six foot if it is a calm day on a lake or canal can give me the sensitivity to spot delicate bites.

The important thing is that the float allows you to control the presentation and the bait.

If you wish to read an explanation of different patterns and materials then follow the link below and read the first part of the article by Nemesis. It is not exhaustive but it covers the basics.

http://www.maggotdrowning.com/forum/topic.asp?TOPIC_ID=104164


Parts of the Float
There are four basic elements to a pole float – bristle, body, stem and eye. Though not all pole floats will have all of these.


A standard pole float showing the four basic parts.


A tiny dibber style float I use. 
Shown next to a 5p coin for scale.
 

Eyes
Just because pole fishing is complicated we of course have to have at least two types of eyes.

First is what is known as a side eye. This is made from a piece of fine wire, twisted and with a loop or hole, the “eye” at one end. The cut end is pushed into the float body so the eye sticks out enabling the line to be threaded through.

When playing big fish these eyes can be pulled out of the float. Thus there was seen a need for a more robust type and the spring or figure of eight eye was born.

The spring eye is basically a coiled length of fine wire that fits snugly over the float bristle and has a protruding eye of some kind to accept the line. Being anchored to the base of the bristle it is a lot more robust than a side eye.

I add spring eyes to most of the floats I use for commercial carp fishing though many are made with them already in place.

Commercial Carp Floats
The very limited range of floats I use for commercial carp fishing are detailed in my blog on my simple approach to this type of venue.

http://neilofthenene.blogspot.co.uk/2014/07/my-simple-approach-to-pole-fishing.html

Unfortunately the online store I got my floats from has stopped trading. But reading this article will show you the general patterns of floats I use and demonstrate that you don't need a vast range to catch fish.

Canal, River and Natural Lake Silvers Floats
Rivers and canals can vary tremendously so it is impossible for me to tell you which type of floats you will need for your local waters. The best people to advise is your local tackle shop and experienced local pole anglers.

Generally though you will need floats that are probably lighter and have a finer bristle when tackling canals and lake roach than you would use when targeting commercial carp.  Rivers may demand a much heavier float with a more buoyant bristle to combat the flow and keep the bait where you want it.   

Lollipop or Flat floats
Specifically a river or flowing water float. Worth mentioning because they are so different to anything else. Having used them to good effect I can attest to the fact that they are not a gimmick and truly work.

Two views of a flat float.
 
When sitting perfectly in a river's flow the bristle will be vertical.  These floats range in size from around 1 gramme to as much as 75 grammes (3 ounces!) for deep, fast flowing rivers.  The much larger sizes tend to be used more on the continent, most British rivers not requiring such extremes.

Hand Made v Mass Produced
Here you very much pays your money and takes your choice.  I have never used hand made floats.  Not because I have anything against them, I just have never felt the need.

Those that swear by them tell me they are more robust and have a better build quality. 

All I can say is that I am happy with the mass produced floats I currently use and see no reason to switch.  My advice would be to learn what you want from your pole floats before plunging into the hand made arena.  There are plenty of good makers out there.  And for the adventurous you can make your own.  All the materials are available on eBay.

Float Care
There is not much to say really but I will mention a couple of things. 

The first thing I do with any new float is to give the body a couple of coats of clear nail varnish.  Some will insist it must be a certain brand.  I just go for the cheapest I can get.  I will then re-paint the floats with a coat or two each time I re-make a rig, particularly where the line may have cut into the body. 

I know the float should be ready to go when bought but I get a little bit of confidence knowing I have sealed all the holes (stem, bristle, eye) and given the body that little bit of extra protection.  The varnish dries to a very thin finish and so has no noticeable effect on shotting capacity.

Not something I have done but you could, if you so wished, use a coloured varnish and so make your floats individual, even sparkly or fluorescent - tackle tart heaven?

The other thing I do with my floats I use for carp fishing is to add a spring eye if there isn't one already.  The eyes can be bought cheaply on eBay and a spot of superglue will hold it in place on the bristle.  Just make sure you get the size right.  For a 2mm bristle you will need a 2.1mm eye.

And if I do damage a float I have no issue repairing it if at all possible.  I have re-fitted bristles stems and eyes.  Just superglue in place and nail varnish over when set to seal.


My final word on pole floats is that I am a believer in the old adage that if it looks right then it will be right.  If a pole float looks to you that it will do the intended job then use it with confidence.

Best example of this is the float I love to use on the canal.  To me it just looks beautiful, and it is brilliant for those small canal roach.  7 inches/18cm long, 0.2g and a bristle that can be sunk by a No.12 shot.

Monday, 10 October 2016

Beginner's Guide To Pole Fishing, Part 3b - Elasticating Your Pole (2 of 2)


Fitting the Bush

There are two ways to approach this.
  1. First is to cut the tip of the topkit back to the diameter or length you want and then go in search of a bush to fit.
  2. The other is to find a bush that will accept your chosen elastic and cut the tip back to accommodate it. 
Given the scenario I described earlier with match and power kits for your pole you may need to adopt both methods in getting all your topkits kits to the same length.

Let me assume that you wish to have a certain elastic in your match kit and have sourced a bush of the right diameter to accommodate this. Offer the bush up to the topkit and find the point on, presumably the number one section, where the bush looks like it will fit. Now cut the section around 2-3 inches above that point. You can cut bits off but not stick them back on. I detail how to cut carbon in section 3a of this guide.

If you have an external bush the tip should go into the bush loosely, an external will not fit in at all. Now remove roughly an inch of tip at a time, or less when getting close, until you get a snug fit of either internal or external bush.

You can, if you wish, use a small drop of superglue to stick the bush in place but I have never found this necessary.

Fitting the Bung


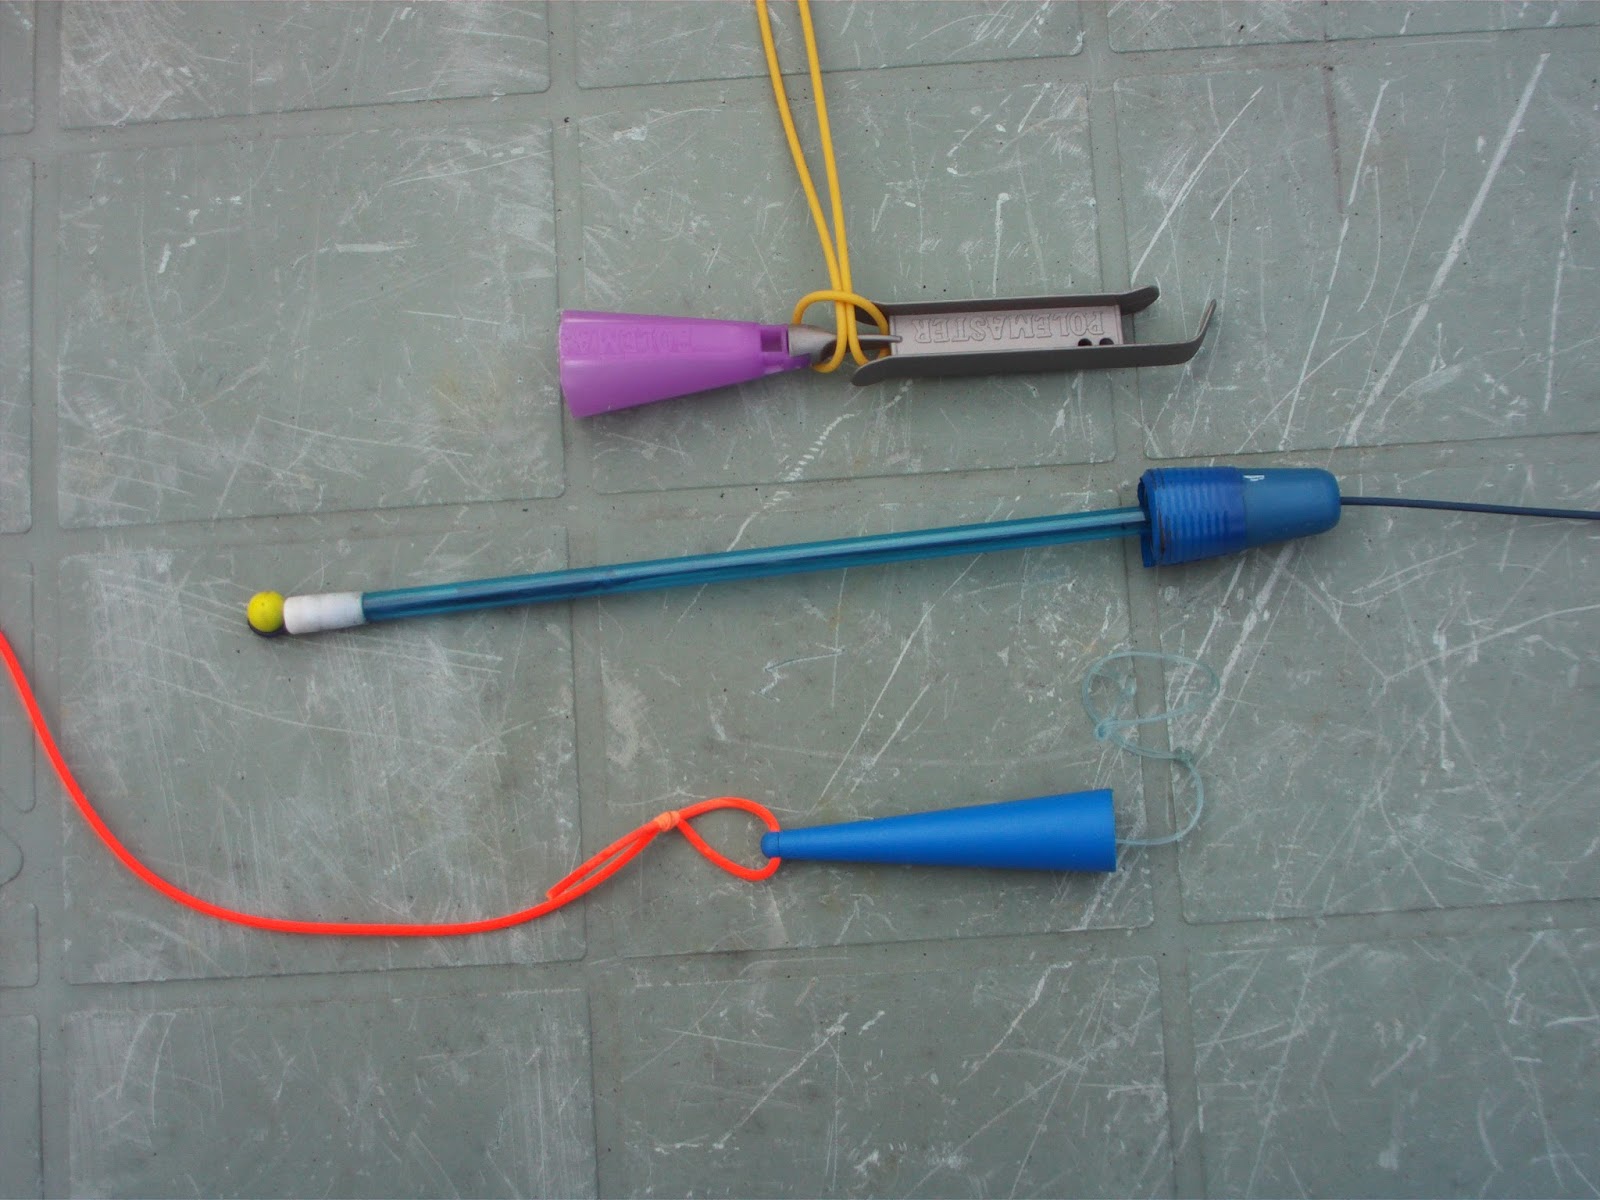
 Examples of three types of bung. 
The top is a winder bung showing the elastic attached by way of a loop in the elastic and a cow hitch.  Middle is a puller bung. 
Bottom a non-winder bung. 
 

I'll mention side pullers later.

All bungs except pullers are supplied with an extractor rod.  This is used to pull the bung out of the topkit after it is fitted and during the fitting process.  Puller bungs as you can see from the picture have a rod fixed to them permanently.
 
Like cutting the topkit back this is a job not to be rushed. Take it one stage at a time and don't be tempted to try and go for it in one cut.

The end product will be a bung that gets pulled into the butt of the topkit by the elastic far enough not to foul the male number four section when inserted but still within reach of the extractor rod.  In the case of a puller bung the rod needs to protrude slightly from the butt so you can grasp the bead and pull the elastic.  Better it sticks out too far than disappearing up the pole to start with.  Final adjustments can be made later.

You need to buy a bung that is approximately the right size, slightly oversized, for the butt end of your topkit.   It should have a small amount protruding from the bottom of the section when first inserted.  Insert the bung into the end of the topkit and with a pen mark where it meets the carbon.   

Gently cut round the bung at the marked point, most have concentric rings or ridges to help you. Once cut offer the bung again and see how far it will go into the topkit. You will find it goes a very short distance. Now trim another ring off the bung and fit again. Keep repeating this until the bung will go far enough in so as not to foul the number four section when it is inserted but still within reach of the extractor rod.  

When trying the bung for fit push it firmly up the section with the extractor rod. Not too tight but comfortably snug. If you are not sure leave the final cut until you have fitted the elastic even if this means that for now the number four cannot be fully inserted.

When you are happy with the fit remove the bung and place to one side.
 
Cow Hitch Knot
I refer occasionally to a knot I know as the cow hitch.  It is worth showing here how that knot is formed.


Threading the elastic

There are numerous videos on YouTube showing how to elasticate a pole.  I suggest watching a couple before doing your first one.

A diamond eye threader is the best tool to get the elastic through the sections of the topkit. 
 
You may wonder why not just poke the elastic through the topkit, why use a threader? Elastics have a tendency, particularly light ones, of sticking to the inside wall of the topkit. So it is a lot easier and less frustrating to use the threader.

I always look to fit the bung first as it is easier to get the right length of elastic with that in place.

And a good tip to prevent pulling the elastic through and having to start again is to clamp the free end in a clothes peg.

Depending on the length of the topkit and the length of the diamond eye threader you may have to play around with either threading each section of the topkit separately (take apart) or telescoping the sections together if the threader is too short to do the lot in one go.   I have solved this problem by making my own threader that is longer than most pole topkits.

To attach a winder bung or bung without a winder and with the elastic through the topkit tie a loop in the bung end of the elastic. Use a cow hitch type loop to attach the bung at the bottom of the winder or the top of an ordinary bung, or insert the loop into the bung's connector. You can take a few turns of elastic around the winder if you wish at this point.

If using a puller bung thread the elastic through the hollow rod of the bung and then through a bead. Tie a knot in the elastic big enough so it cannot pull through the bead under tension. With a round bead I will tie a loop in the end of the elastic, pull this through the bead with the threader and trap the bead in a cow hitch pulled tight. 

Pull the elastic from the tip of the pole and seat the bung into the base of the topkit. With the topkit at full length keep pulling the elastic from the tip until it bottoms out, or nearly so. Gently release the elastic back into the pole.

I like to set my elastic so it just creeps back into the pole before the attached connector or dacron butts up to the bush. To do this I pull a few inches of elastic out and feel the tension, letting the elastic slide back in a few times until I am happy I know where I want the connector tied on. I mark an inch or two above this point with a marker pen. I can now release the elastic knowing I can find that mark again.

Get a disgorger or cocktail stick and then pull the elastic out so that the mark is now 18 inches or so outside the pole. Form a cow hitch around the disgorger/cocktail stick and let this butt up against the bush. The elastic will tighten and not retract back into the pole. You can now safely cut the elastic at the mark and not have it spring back into the pole.  This makes fitting  a connector or dacron a lot easier.  You can also use a clothes peg with a strong spring to do the same job. 

 
As described, a disgorger used to prevent the elastic
outside the pole being pulled back in while working on it. 
When done the knot slides off and disappears. 


Side Puller
I find it easier to put the elastic through the side puller (roller or slot), out through the butt end and then re-thread towards the tip.   You may want to put the elastic through a bead and tie a knot as with the puller bung first then put the other end of the elastic in the eye of the threader.  This will prevent you pulling the elastic all the way through and having to start again.  Or again, grip the elastic with a clothes peg.

Attaching a Connector
Remove the larger collar from the connector and slide this onto the elastic – right way round. Then pass the elastic through the hole in the connector and tie the doubled elastic into a knot. I use a figure of eight. Moisten the knot and tighten up to the connector. Cut off the spare elastic and slide the collar onto the connector. Remove the disgorger/cocktail stick from the elstic and everything should spring back into place with the connector snug to the bush.

One small adjustment I make to my connectors is to cut the end off of the collar with a sharp knife. You will find that many collars have the end that is going to butt up to the bush will have a shoulder making a smaller hole than the other end. I find this can restrict the knot and when playing larger fish even pull the collar off. So I cut the shoulder off to allow the knot to move freely.

Attaching a Dacron
Best thing I can do here is to point you to a video demonstration. This Alan Scotthorne video shows this and how to attach your rig.


That should be your topkit elasticated.

Maintenance
You should not have to do much with the elastic apart from checking it for wear.  You would normally notice any deterioration or wear each time you fist a rig on.  It is worth just looking at the last few inches of elastic every now and then to check it is OK.

If the elastic does show signs of wear or is deteriorating then there are two options.  You may need to replace the whole elastic.  If though you have wound a few turns onto a winder bung you should be able to undo these and then re-fit the connector/dacron.  This will remove the worn section of elastic.

Because I change elastics Autumn and Spring for strengths applicable for Summer and Winter I just replace the whole lot at those times.

When you do change elastics it is worth flushing the topkit with warm, soapy water to remove any dirt that may have got in.  Remove the elastic and bung and either suck the water up from the tip end and let it drain out or pour the water down from the butt end. 


Thursday, 6 October 2016

Beginners Guide To Pole Fishing, Part 3a, Elasticating Your Pole (1 of 2)

Because of the total length of this section I have split it into two parts.

Part one covers elastics and choosing which for your pole plus cutting topkits and cupping kits and fitting a pole cup.  Part two will cover fitting the bush and bung, fitting the elastic and attaching a connector or dacron.

Many newcomers will get their local tackle shop or a friend to elasticate their topkits.  But I guarantee that eventually, if you take to pole fishing, this is a job you will want to do yourself.

Elastics


First thing to decide is what elastic you need. To make that decision you need to know something about elastics.

And while it may seem obvious, I will mention that all elastics are of a round cross section.

Grading
In the UK elastics are graded by number, the lower the number the thinner/weaker the elastic. Obviously the thinner the elastic the less weight it takes to stretch it. So larger numbers for larger fish, stronger lines.

As a rough guide it is said that you can team an elastic up with a line of maximum breaking strain half as much as the elastic number. So a number ten elastic can be used with lines up to five pound BS. In practice though the actual breaking strain line used will probably be less than half of the elastic's number. But this gives the beginner a guide as to the size of fish that can be landed on any given grade of elastic.

The problem comes though in that there is no industry standard and so you will find elastics of the same number from different brands may differ slightly.

And then some elastics are stated as a range of grades for example 18-20, 6-8 or 10-14. And the brand called Hydro is graded by colour.

About the only thing I can advise is to keep it simple to start and experiment over time and settle on a brand and grade that fits what fishing you do and you feel comfortable with. As a guide or starting point I will give details of my choices/suggestions later.

In France they appear to be a bit more logical and elastics are graded by diameter in millimetres.

Types of Elastic


Solid
Solid elastic is as it says, solid all the way across its diameter.

Hollow
This type of elastic has a hollow core running through its length. Preferred by many over solid elastics it tends to be softer when first stretched but get tougher the longer it is stretched out. It will also stretch further for any given length than a solid elastic of similar diameter/grading.

Users also report that it lasts longer before deteriorating and needing to be replaced.

Hydro
As far as I know this was the first hollow elastic sold and preceded puller bungs. The central core is filled with, I believe, a silicone liquid. The thinking behind this is that when the elastic is bent around the bush while playing a fish the elastic may stretch a little but the liquid below the constriction caused by the flattening against the bush makes it more difficult for the elastic to stretch further. So an angler can either reduce the angle between pole tip and fish and allow it to stretch the elastic or increase the angle to prevent more elastic stretching from the pole.

Hydro is the most expensive but again appears to last a lot longer.

Latex
A form of solid elastic that is made from pure latex rather than standard solid elastics that will have other ingredients. It is said to be softer than standard solid elastics and thus is preferred by some when targeting such fish as skimmers that can have soft mouths and a harsh elastic may cause the hook to pull out.

Some anglers prefer to use a lower grade elastic but doubled so that there are two strands being used side by side to play fish. It is claimed this provides a softer initial stretch but powers up as the fish takes more from the pole as in the case of hollow elastics. Something to dabble with when you become a pole expert.

What to Choose
As this is my guide I will give my advice. I know others will disagree but that is what forums like Maggotdrowning.com are for, getting a range of opinions. I think with my experience what I use is a good starting point. You can then go on and research and experiment as you get comfortable with fishing the pole.

In my canal pole I use almost exclusively a Preston Innovations number four solid. I find it copes with any canal fish I have so far encountered with the exception of the odd rogue carp. From half ounce roach and gudgeon to three pound bream. Admittedly the latter does prove an interesting fight but can be landed with care. I have also had tench to three pound on size three elastic, hairy but landed. I team this elastic with lines down to 0.06mm diameter (12oz BS).

I have a couple of topkits with ten solid for those odd occasions I may be targeting far bank canal monsters like tench or bream.

For rivers, if I fished them regularly, I would use something like a Middy 6-8. Still capable of coping with tiddler species but with a bit more toughness for playing larger fish in a current.  For targeting species like chub or river tench, large river bream I would opt to increase the strength to a ten or twelve.

As most of my fishing is on commercials with carp as the target I take a no messing about approach and use a Preston 16 solid and Middy 18-20 solid with no puller. I still manage to land fish down to a couple of ounces and occasionally less. But as these are not my quarry I see little sense in compromising on choice of elastic to account for them. I would rather bump a 4 ounce skimmer than lose a 10lb carp.

The majority of commercial anglers have probably now switched to using light hollow elastics and puller systems. I have tried these and cannot get on with them. And I would suggest for the beginner not to complicate matters using them - at first. Once you have the experience then by all means try them out. They work for so many but not for me.

So for a first pole for fishing commercial fisheries I would opt for the Preston extra yellow 16 solid. It will cope with carp up to and just over ten pound without having to mess with pullers. Get your playing technique sorted before going the soft hollow route. I'll cover playing fish in a future post.

Some new poles have side puller systems already fitted to the topkits.  If fitting to a side puller system you can still use this elastic and may not have to use the puller system when playing anything but exceptionally large fish.

One thing I don't agree with is fitting various grades of elastic in multiple topkits. Unless you really are going to use just one topkit on one type of venue then I see little point in compromising. If, for example, you are going to use the pole on a carp dominated commercial water then have a single grade elastic in all topkits capable of coping with the average size of fish being caught. You cannot predict what will take the bait next so having different sized elastics for different fish on the one venue is illogical to me.

Cutting Carbon
When fitting a bush or a cupping kit you will need to cut the pole at some point.  Also if you buy a universal topkit to augment those that come with the pole you may need to cut the butt section for a comfortable fit.  Carbon fibre can splinter easily if cut too aggressively.  With the right tools and patience it need not be difficult.
 
For cutting the pole I use a hobby rotary tool like a Dremel, only cheaper from eBay, and a diamond cutting disk. This I feel is the best tool for the job. For me a good investment at around £15 in total. Also proved useful for other fiddly jobs around the house. Cutting the pole with this takes seconds and does a neat job. Go slowly and don't force it and you will get a neat finish.
 
Next best thing is a fine file, either triangular or oval. I think they may be referred to as jewellery files. Will take a little while using this but getting aggressive will only end in splintering the carbon. Available on eBay for under £5.

With the edge of the file make a shallow groove all round the section. Then slowly work around the section making the groove deeper until the section comes apart. Do not try and saw through like you would if cutting a drainpipe. Tidy the cut edges with a piece of fine sandpaper or the flat of a fine file. You may want to tidy the inside edge of the cut, do this with a rolled up small piece of sandpaper.
 
Some people recommend a junior hacksaw. I feel these are too coarse and can cause problems.  And you only have to make one mistake to ruin the job.

And speaking of universal kits.  If I do have to cut the butt section to fit I will use a six inch section of the offcut to sleeve over the butt and thus reinforce it.  It may not be necessary but it gives me confidence.  Most topkits have a strengthened area at the butt and if you have to cut this off to fit your pole then I feel it is worth taking this precaution.  I glue the sleeve in place with epoxy.  It may not want to stay in place while the glue sets so I use electrical tape bound round to hold it.   

Topkit & Cupping Kit Lengths
Ideally you want all of your topkits and your cupping kit to be the same length when mounted on the pole's number four (or three – see Part 1) section. Making an assumption that you have at least one  match top three and one power kit plus a cupping kit I would start with the match kit. Things are easier if you have kits of the same type as they can just all be cut to the same length and the same bush fitted.

Many newcomers to pole fishing try and keep as much of the pole as they can and cut back a minimal amount. Given that we are possibly talking of losing a few centimetres from a pole that is ten metres or more in length this is not necessary. Cut the kit back as far as you need to fit your chosen elastic easily. Actually the shorter the topkit the stiffer it will be and thus reducing friction between elastic and internal wall thus improving the efficiency of the elastic. And remember that to fit an internal bush you will need to cut back further than for an external bush that would take the same elastic.

Some people remove the number one section from the match kit and put a bush directly onto/into the uncut number 2. This will produce a kit more capable of taking a thicker, stronger elastic even up to the same grade as may be fitted in the power kits. 

If you want to fit an elastic of a particular diameter then select this and get a bush capable of accepting that thickness easily. Once you have fitted the bush to this topkit you will be able to work out where your other kits need to be cut to match the length and then get a bush to fit.

Also note that while it is perfectly possible and acceptable to put thinner elastic through a wider bore bush the opposite is not possible.

Cupping kits are usually long enough that they can be reduced in length to suit the topkits. But there is a particular way of doing this that will be covered next. Do not rush to fit the cupping kit ferrule permanently to the cupping kit until you have read how.
 
Fitting a Pole Cup
When you buy a pole cup system it will come with two or three cups and one or two ferrules.  The two ferrules will have different internal diameters into which the tip of the cupping kit will be glued.  You will need to choose the one that will fit your cupping kit at roughly the right length but not shorter than the elasticated topkits.  A bit of a guess but it should be the narrower bore ferrule that you will need.
 
By offering the ferrule up to the number one section of the cupping kit you will be able to work out roughly where the ferrule will fit on the tip.  I would mark the tip in some way and check that the cupping kit is going to be at least as long as the topkits when mounted on the number four section.  If it isn't then you may need to cut your topkits to match the cupping kit.
 
Cut a few inches above the mark and try the ferrule for fit.  You will be gluing the ferrule in place so a snug but not necessarily tight fit is required.  If you need to cut some more off the tip to get the right fit do so in one inch stages.  
 
DO NOT GLUE THE FERRULE IN PLACE YET  
 
If the cupping kit with ferrule in place will be longer than your topkits by more than four to five inches you will want to shorten it.  If a lot longer then you may need to use the ferrule with the wider fitting. 
 
To shorten the cupping kit by a few inches you cut and telescope the number one section.  Cut the section at a point halfway along its length.  Tidy up the cut and telescope the two halves together.  This should reduce the length by around four inches.  If the cupping kit is still too long then repeat the process at the three quarters and quarter point until the kit is the right length.
 
One benefit of this telescoping method of shortening is that it will stiffen the cupping kit so it won't bend as much when shipping out with a full cup.
 
Once you are happy that the assembled cupping kit is the right length then glue the ferrule in place using an epoxy glue.  Most cupping kits are take apart but if the cupping kit is telescopic then please ensure it is telescoped before gluing the ferrule in place.

Thursday, 22 September 2016

Beginner's Guide To Pole Fishing, Part 2 - History and Buying a Pole


History
I think it is worthwhile taking a few lines to tell the story of pole fishing. I have covered it in part in my blog on pole memories. But worth repeating here for newcomers.

Some will try and tell you that pole fishing started in the UK after WW2 and was introduced from the continent. That is certainly not true. London anglers were using poles on the Lee & Thames a long time before that. The pole was used around London probably at least 150 years ago. Shorter than today's carbon monsters they were made of bamboo. Probably no more than five or six metres in length. But at this length still longer than a tree branch or rod. And in case it is forgotten were called roach poles. It is only recently the term “roach” has been dropped as modern materials have allowed the pole to be used for much larger species.


A fine example of a bamboo roach pole


Of course no elastic originally so the line was tied to a thin piece of bamboo at the tip. They would have been take apart and probably each section unmounted to land a fish unless they were fished to hand. Original lines would have been braided silk or hair from a horse's tail.

The pole then evolved when fibreglass became available at a reasonable price. One major change was that many fibreglass poles were telescopic. The maximum length was still around seven metres. I think the envelope was pushed with some eight metre poles but at that length they were far too flexible and heavy to be worthwhile. Flick tips were still the order of the day and this really limited the size of fish you would target. I have seen tench and chub landed on such poles but playing them was very much squeaky bum time if they were of any size.

Eventually someone had the idea of using a short length of elastic attached to the end of the pole. I have to admit that I am not sure when someone thought of using an internal elastic through a hollow tip section. Whether this pre-dates carbon poles becoming available or not I don't know.

Then carbon fibre became commercially available and once prices began to fall carbon poles started to replace fibreglass, take apart became standard as manufacturers realised the potential for making longer poles and worked out how to reduce the weight while retaining strength and rigidity.

The one thing that I have to admit did come from the continent was bristle topped pole floats. Until then we pretty much used standard waggler and stick floats all be it in smaller sizes sometimes. I fished with masters of the art of using a stick float, on a pole, in running water but anchored with either heavy shot or a drilled bullet.
 
 I can still recall walking along the length of an evening match on the river Lee in north London and seeing my first bristle topped pole float in use. Immediately the advantage of such a float was obvious to me. The following weekend I bought my first couple.  These may even have been them, but I doubt it.
 
 
Two very old Ivan Marks branded pole floats. 
I guess from the late 70s, early 80s. 
At the base is a twisted wire loop like a long float eye instead of a solid stem,
the line was held to the body by the white float rubber. 
 
And if anyone wonders, yes I am old enough to have fished with a bamboo pole, fibreglass and now carbon. I was probably one of the first to fish a pole on the Trent in the mid 70s (framed with a catch of roach & small chub). I still have my fibreglass poles as well as all the carbon poles I have owned.  Most of the carbon ones are still used occasionally.


Buying A First Pole
Once you decide to buy a pole you will realise what a wide choice you have. I cannot tell you what to buy, at the end of the day that has to be personal choice based on your style of fishing and budget. I will tell you what not to buy – initially. 

I will try and keep any advice on poles as generic as I can. They are, after all, used on all types of venue - canals, rivers, natural and commercial lakes. And used for all species. Though today I guess the majority are manufactured for, sold for and used for commercial carp fishing.

Do not go out and buy a top of the range “flagship” pole before you have learned how to fish the pole, any pole. Buying the best straight away will not guarantee you instant success and will certainly not guarantee you even like this style of fishing.  I guarantee you will break a section before you master the beast.

And don't get hung up on thinking you NEED 16 metres of pole to catch fish. Just as many are caught within ten metres of the bank as further out. Fishing closer in for a while will teach you how to control the float, feed, cope with windy days and learn how to ship smoothly and safely. Before the advent of carbon fibre poles I was quite happy catching fish with seven metre fibreglass.

For a good guide on buying a pole have a read of Gaz Malman's post on Maggortdrowning.com.

 
My advice would be to initially buy a comparatively cheap margin or short pole. These are available for between £50 and around £250.

Why?
  • Being stronger you are less likely to break a section while learning. More expensive poles will be lighter but more fragile.

  • You will not be tempted to try and fish at 16 metres at your first attempt

  • When you do buy THE pole you will have the margin pole for that very purpose – fishing the margins (if you fish commercial lakes) or just as a spare

  • If you decide pole fishing is not for you then you have not wasted hundreds or thousands of pounds

  • As you take time to improve your pole fishing skills then you will have had time to learn what poles are out there and which will suit you and your fishing

  • Any short pole will be useable for fishing any type of venue and any type or size of fish. The size of elastic and matching lines will adapt the pole to various uses. And while you can successfully fish light lines and elastics in a strong pole the reverse is not a good idea.

Margin poles tend to be no more than 10 - 11 metres. Once you are comfortable handling this length of pole you will be ready to try something longer.

I might suggest you get along to a tackle shop where they have poles made up in a “pole alley”, but as a novice you really won't know what you are looking for or feeling when trying poles out.


The best advice I think I can give is to buy a margin or short pole bearing one of the recognised brand names. They are unlikely to be selling something that is totally unusable. For myself I have a Maver Abyss X Margin pole, £50 and 9.5 metres. Bought purely on instinct that with the Maver name it would be OK. Was it? Well, a few months after buying it I bought a second so I had a complete set of spares and/or a spare, strong pole to lend to anyone who wanted to try pole fishing plus another couple of topkits.  A great piece of kit for the money. Pole fishing does not have to cost the earth.

Spend what you are comfortable spending on a branch of the sport you may not enjoy. Remember to keep some cash back for the fittings needed. To rig out three topkits and a cupping kit you will need in the region of £30. And a perfectly good pole roller can be had for around £20, one is enough for a short pole.  Then there are pole floats, float tubing, winders, anchors line and hooks, possibly small shot (8-13).  Easily another £30-50.  So I guess you need to budget another £100 more or less on top of the cost of the pole.

I would suggest that as a minimum you want three topkits plus a cupping kit. Known as the spares package, the number of topkits will influence the price a fair bit. If haggling over the price it should be one of the things you ask for, either extra kits or a cupping kit, even the cups thrown in.  Any fewer topkits and you will have a day when you regret not being able to switch rigs quickly.

Personally I would always buy new but there are plenty of people who have picked up second hand bargains from sites like eBay. My advice would be to ask the opinion of an experienced pole angler before bidding on a second hand pole. 

When you do decide to go for a longer, more expensive pole then you will have more idea what you are looking for. I would also highly recommend joining an angling forum such as Maggotdrowning.com and asking the advice of experienced members. But remember that this is one subject where one man's meat is another's poison. People do have their favourite brands, but can they tell you why? Read people's opinions of poles but look at the overall responses, take note of an individual's response but don't base your decision on one review.
 
A question worth asking is whether the manufacturer makes spare sections after the pole itself has been replaced with a new model. Some companies stop production of spares immediately, others carry on for up to five years.  Though with a thriving second hand market it may be possible to pick up spare sections, or even a complete pole if necessary at a fraction of new costs.  Even if you don't need them immediately they can be put away for that day when - crack!

Accessories
In the glossary, that I hope you have read, I list a number of pole accessories.  Most, if not all are not essential.  The one that comes closest to being essential is a roller.  All accessories should make using a pole easier, if not then they are useless.  I can still recall the first time I used a roller.  Previously I had just used my rod bag to slide the pole (10 metres at that time) backwards.  The difference was a revelation.  It makes everything easier, smoother and quicker, even at lengths less than ten metres.

Rollers can cost from around £20 to over £100.  I have three, none of which cost more than £20.  At times when fishing a pole at 14.5 metres I have been known to use all three.  But I will explain the circumstances in a later post when I will talk about the correct positioning of your roller(s).

Pole socks, tulip rests, over & under rests all have their uses but are not essential to get fishing with a pole.  These are things to add as you get more experience, develop your own style and methods and realise that you need the particular piece of kit.  Or convince yourself that you do.

 
Pole Bought, What Now?

Next time – elastication (split over two parts as the subject can be complex) 

Thursday, 15 September 2016

Beginner's Guide To Pole Fishing Part 1- Glossary


Talking with a novice angler recently and he was bemoaning the lack of a good basic guide to fishing with this particular type of rod. So first thing to discuss – what is a pole?

In the USA all rods are known as fishing poles but in Britain we make a distinction between two types of fishing implement - rod & pole. What we call a rod has a reel attached to the handle or butt end and the line runs from the reel though a series of eyes and out into the water. The pole is effectively a long stick with the line attached to the end furthest from the angler, there is no reel, no eyes. I'll explain more in a History section later.
 
The use of carbon fibre means that poles can be up to sixteen metres long and some have been made slightly longer.  Generally sixteen metres is seen as just about the maximum useable length possible with the carbon fibre available today.

I will also cover pole floats as a separate section but for now assume that everyone knows what a float is.

The first thing to go through is a glossary of terms and names.
 

Glossary


Not in alphabetical order because some things follow on naturally from the previous item.

Section – A pole is made up of a number of sections of (normally) carbon fibre tube. Each fits to the next until you have the fully assembled pole from butt to tip. Sections are generally around 1.5 metres in length. Each section gets successively greater in diameter from tip to butt. Sections are numbered from the tip (pointy end) to the thicker butt.  The thinnest section is either number 1 or number 2 (see Topkit below). The pole can be used with any number of sections in place depending how far out you want to fish.

Topkit – Traditionally the top three sections of the pole though some topkits may only be made of two sections. The widest section that fits to the rest of the pole is always the number three unless marked otherwise. A two section topkit will be missing a number one section and the remaining two sections longer to compensate. If the pole is elasticated then the elastic will run through the topkit.  Topkits can be telescopic or take apart.  Always find out which before elasticating.

Match Kit – Normally a lighter and three section topkit used for smaller fish, lighter elastics and lighter lines.

Power Kit – A heavier, stronger and two section topkit.  The wider section will still be the number 3 unless marked otherwise.

  • NOTE - I am told that at least one manufacturer, MAP, are making poles with no match kits.   The only topkits available are two section and that as a consequence what would be a number 4 section on other poles is a number 3 on these models.  I believe though that they are labelled with the section numbers to avoid confusion.
Cupping Kit – A topkit used exclusively for attaching a pole cup to the tip. The cupping kit will be fitted with a ferrule at the tip end, this ferrule will either have a bolt screw thread or nut in the end for attaching a pole cup. Cupping kits are not used to catch fish. They are normally stronger and heavier like a power kit.

Pole Cup – A cup that fits onto the end of a cupping kit by way of a screw thread. It is used for feeding larger amounts of bait (loosefeed/groundbait). The cup will have either a protruding threaded section that screws into a ferrule in the end of the cupping kit. Or it may be the ferrule that has the protruding thread and the cup a receiving nut. Pole cups come in various sizes from roughly 50-250 millilitres. The actual size and range will be decided by the manufacturer.

Toss Pot, Kinder Cup, Cad Pot – A small cup that fits near the tip of either a power or match kit. Normally, but not necessarily, smaller than a pole cup. It is used for feeding and allows the angler to feed small amounts immediately over the top of the float/rig and then start fishing without having to change kits. This saves time by not having to attach a separate cupping kit to feed then replace that with the kit to which the rig is attached.  These can be shop bought or home made.  


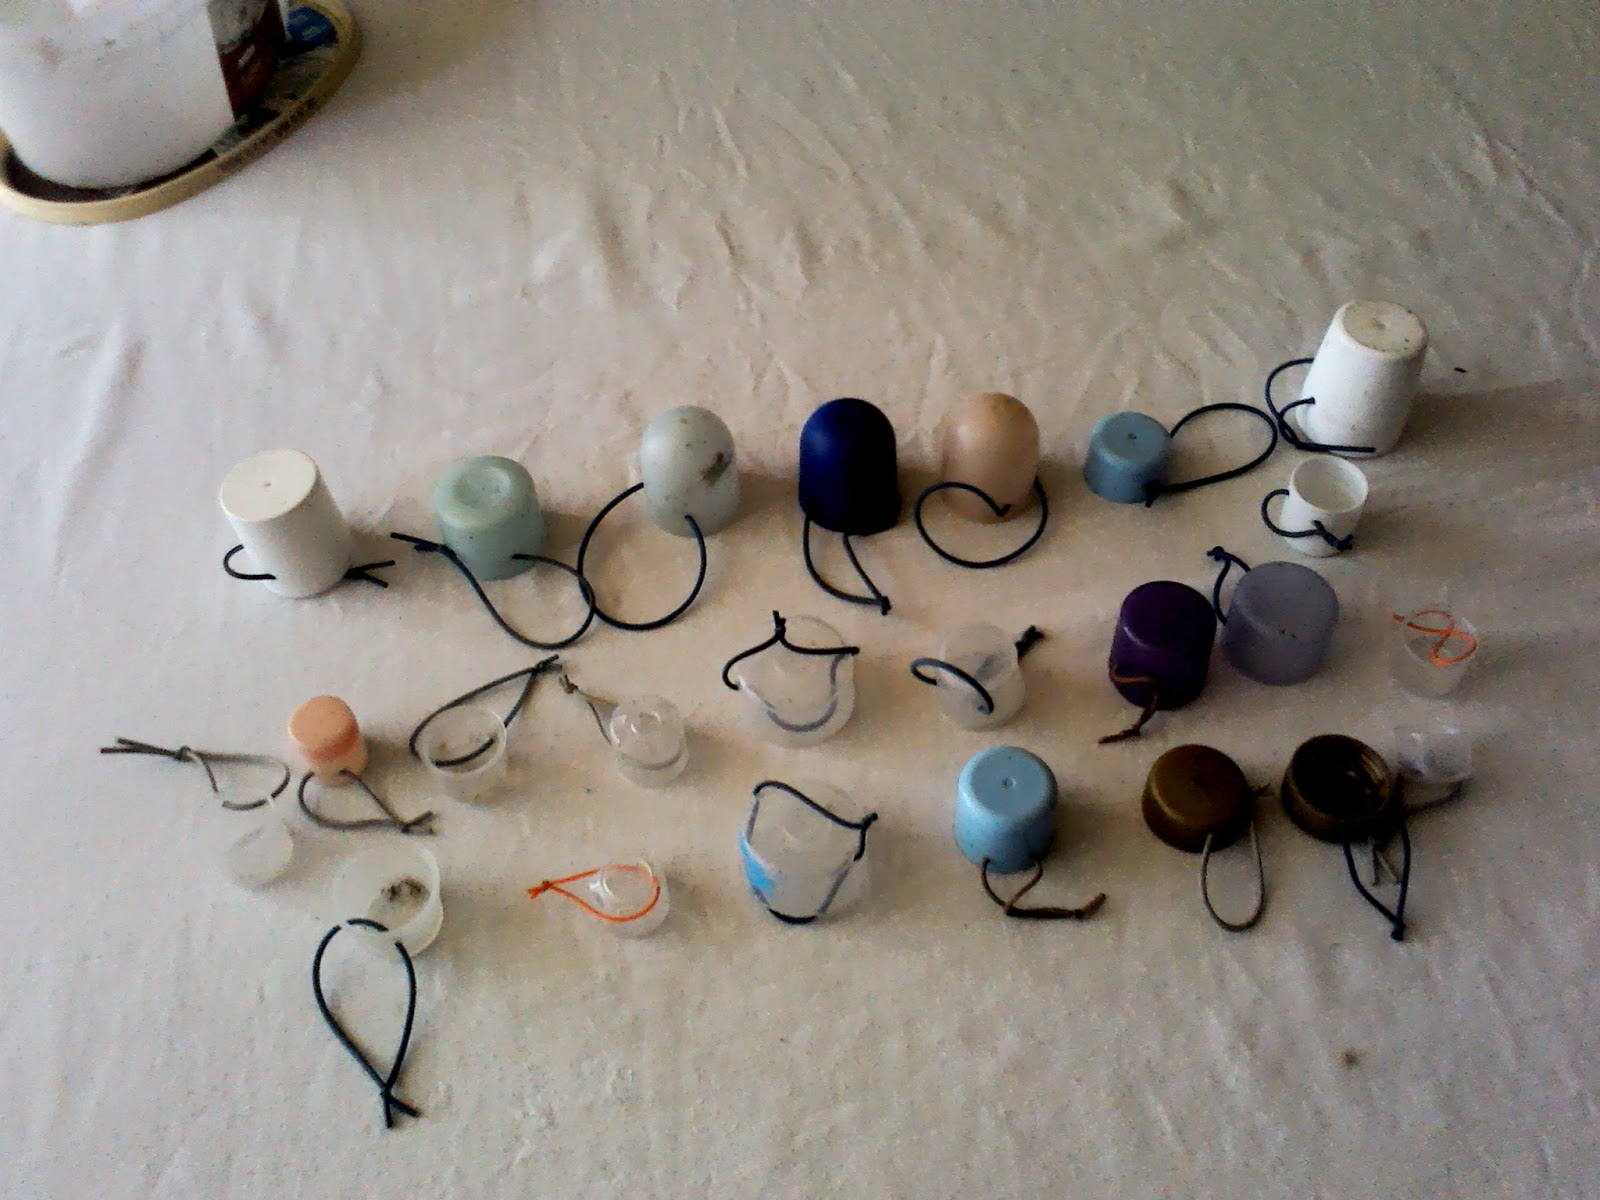
A selection of my home made pots
 
And how they are mounted on a pole tip


Rig – The length of line with float, shot and hooklength attached that is used for fishing when connected to a topkit. When not in use it is stored on a winder and at this point may not have a hooklength on.  A small loop is tied at the top of the rig to allow it to be connected to the elastic.

Winder – A plastic device for storing made up pole rigs ready for use. In its simplest form it looks like a ladder. 

Anchor – A short length of rubber or elastic that attaches to the top of the rig and allows it to be attached to the winder.


A winder with rig attached and held in place with an anchor.
 

Elastic – Most modern poles have a hollow tip through which runs a length of elastic. This stretches from the hole in the tip to a bung at the butt or bottom (widest) end of the number three section. The elastic stretches when a fish is hooked giving the angler the ability to play larger fish that would otherwise cause problems when trying to swim beyond the range of the pole and attached line. The rig is attached to the elastic in one of three ways, connector, dacron or crows foot.

Bush – A PTFE/plastic bush is fitted where the elastic exits the tip of the pole. Reason is that the bare carbon would cut the elastic and on its own would splinter too easily when playing a fish. The bush provides a smooth, low friction surface for the elastic to run over as well as adding some strength to the thinnest part of the pole but which takes the largest amount of stress. There are two types of bush – internal & external. The internal bush fits into the end of the pole while the external fits over the end. Deciding which is personal preference. But to fit an internal bush to accept the same diameter of elastic as an external bush the pole tip has to be cut back further.

Bung – A conical plastic device that sits inside the bottom of the topkit and anchors the elastic. Fitted so that it can be reached with an extractor rod but far enough up the section so as not to be fouled by the male joint of the number four section when inserted.

Winder Bung – A bung with a small winder attached to the nose to enable either spare elastic to be stored or the elastic to be tightened up when circumstances demand more power from the elastic immediately a fish is hooked.
 
 
Winder Bung

Puller/Pulla – A device to enable elastic to be pulled from the topkit when playing a fish. This enables light elastics to be used and extra pressure applied to bigger fish by effectively shortening the amount of elastic being used to play the fish.

Puller/Pulla Bung – A variation of the standard bung that has a hollow rod running up the bung's centre. The rod is long enough to protrude from the butt of the number three section with the bung far enough up so as not to foul the number four when the two are put together. The elastic is passed through the hollow rod and tied off, normally with a bead on the elastic to prevent it from being pulled through the rod when playing a fish.

Side Puller/Pulla – A device or slot in the side wall of the number three section through which the elastic exits the topkit and is anchored in similar fashion to the puller bung with a knot and bead. It is favoured as it adds less weight to the topkit than a puller bung and allows some adjustment to the amount of elastic in the topkit in different situations depending on the average size of fish being caught. It is also easier to use than the puller bung.

Connector, Stonfo - A hard plastic bead that is normally in three pieces, a central core and two sleeves. The central part is an elongated piece of plastic that has a hook at one end and a hole at the other. The connector is tied to the elastic using the hole, the loop at the top of the rig is put over the hooked end of the connector and a plastic sleeve slid over the hook to trap the loop in place. The second sleeve slides up the elastic and onto the connector core to cover the hole and knot making everything neat. They come in different sizes to match different strengths of elastic. Some versions have one sleeve that does the job of two.


A stonfo type plastic connector and a dacron


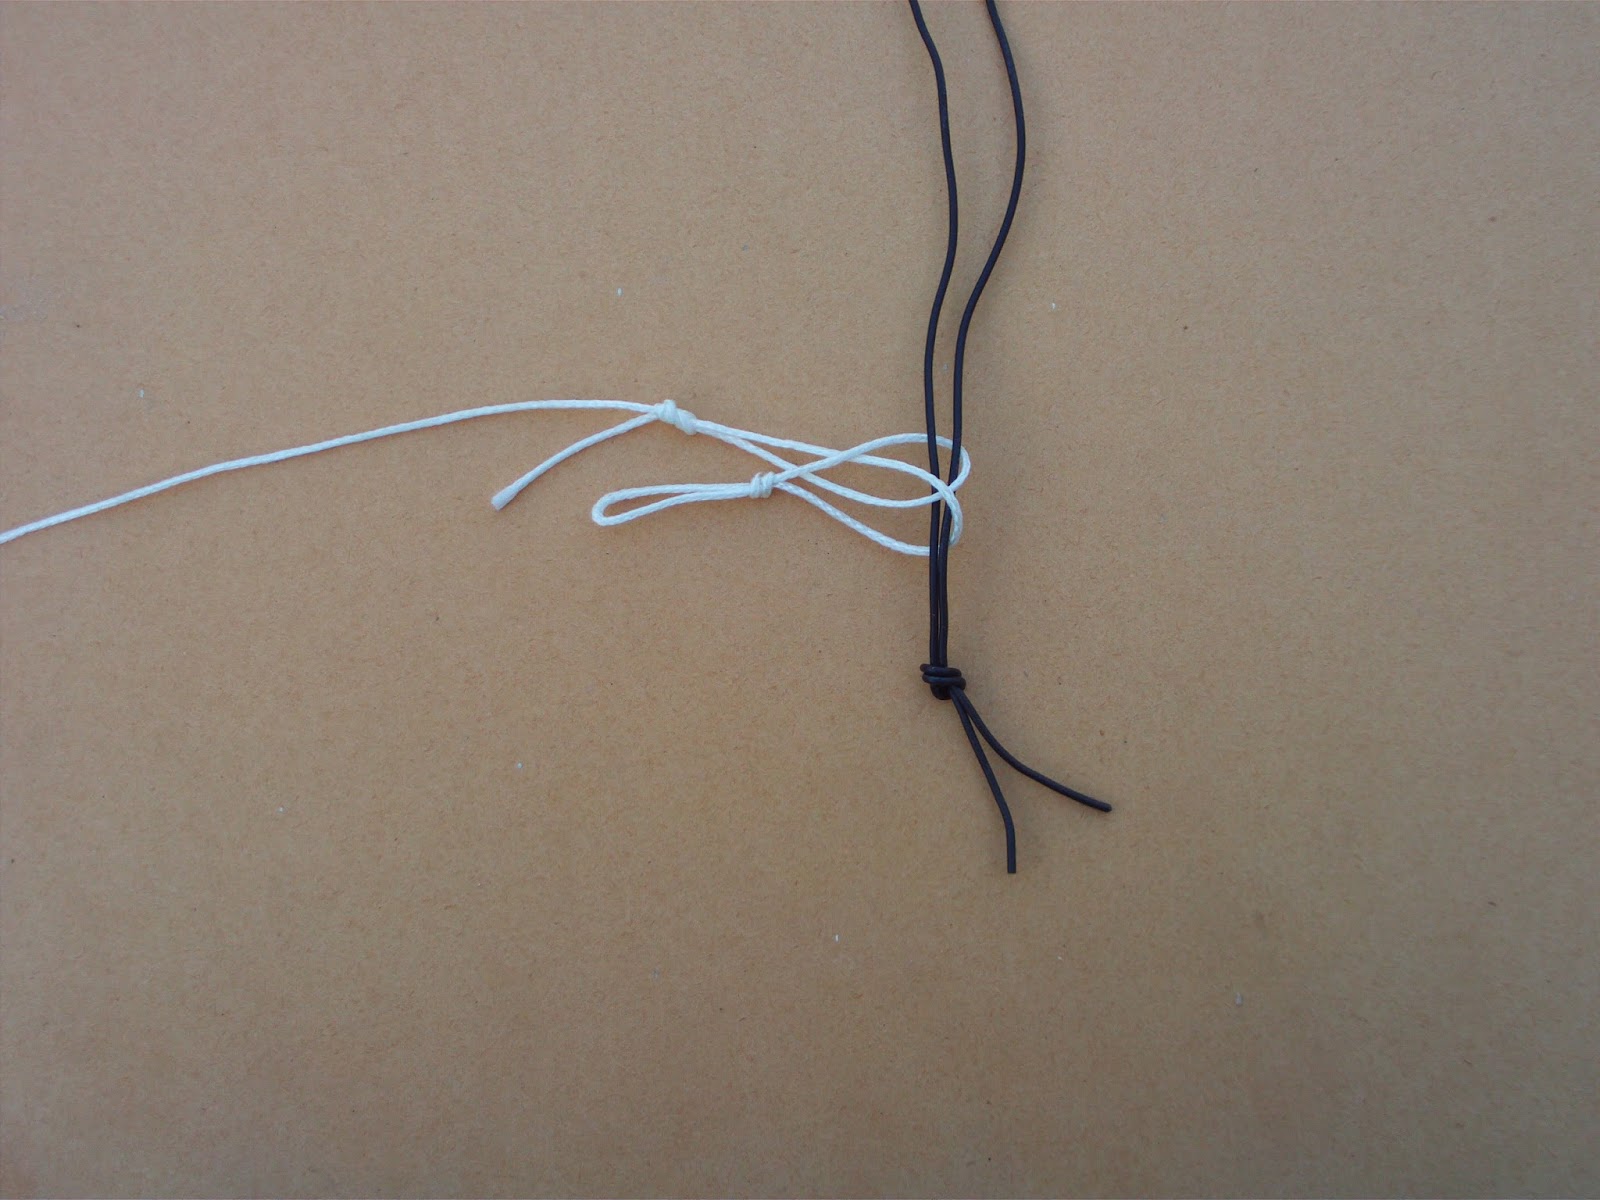
Dacron –  A doubled length of fine dacron string, normally fly line backing, that has the loose ends knotted together to make a loop. A rubber bead or sleeve is slid onto the dacron loop. The elastic is tied to the opposite side of the loop to the knotted loose ends and the rubber bead slid over the top to neaten and protect the elastic knot. The rig is attached to the knotted end of the dacron using a double loop and cow hitch type knot. Describing this method of attachment is difficult, view the following YouTube video for a demonstration.

Video - Connecting the rig to a dacron connector

And a couple of pictures for quick reference


Rig line is the white, dacron the black
 
 
The small tag loop can be cut to leave two tag ends.  This prevents the loop from snagging on overhanging vegetation and releasing the rig or snagging the pole tip and preventing the elastic from working.

 
Crows Foot – A method of attaching the rig to the elastic that is rarely used and was the pre-cursor to the dacron connection. Using the same double loop system the rig attached to the elastic directly. It has fallen out of use when targeting larger fish due mainly to very big fish exerting enough pressure for the line to cut through the elastic.

Lash - A slang term used by some for the length of line between float and pole tip/connector.

Shipping – The act of extending the pole over the water (shipping out) or retrieving it (shipping in). Rather than adding or removing each section the whole pole is slid through the hands until it has reached the desired length over the water or has been recovered to a point where the topkit can be removed.

Roller – A free standing device that is placed behind the angler to allow the pole to be shipped easily, smoothly and rapidly. While one roller is sufficient when fishing the pole at lengths up to 8-10 metres two rollers are preferred when fishing longer. While not essential rollers are a massive aid when pole fishing. Rollers can be flat (horizontal) or V shaped and on three or four legs.

Pole Sock – The name is taken from the similar shaped but much larger wind sock seen on airfields and some bridges. In shape it is like a very small, deep landing net, no more than eight inches in diameter. It is mounted to the front and side of the angler and accommodates the male end of the number four section while the pole is shipped in behind the angler and the topkit unmounted. It prevents the pole from being blown or rolling out of reach, or if on a sloping bank, from rolling forward into the water. Many people manage without this piece of kit that, like a number of pole accessories, is not essential.

Tulip Rest – A forerunner of the pole sock. This type of rod rest gets its name from its shape. It is designed to trap the number four section between two vertical arms that are somewhat flexible. Mounted in a similar position to the pole sock and doing the same job. Many people don't like them because if the pole is blown by a strong wind its rigid nature can cause the number four section to break.

Over/Under rests - A pair of U shaped rests that attach to the legs of a seatbox and allow the pole to be left in them, extended over the water, without having to be held.  The rear one is placed so the U is upside down the front one right way up.  Really only recommended for fishing ten metres of pole or less.  Can cause the box to tip forward if the angler stands up while the pole is in the rests.  Can be a great aid to accurate feeding and positioning of the float.

Spray Bar, Bump Bar – A horizontal and padded bar that is mounted onto and slightly forward of the the legs of a footplate. Many people find these aid holding a long pole steady. Again another non essential accessory.

Diamond Eye Threader – A length (one to one and a half metres) of twisted fine wire with a loop (diamond shaped) at one end. Used to pull elastic through the topkit when elasticating a pole.

Flick Tip – A solid tip (Number 1) section that does not allow the use of elastic. Normally used on a whip.  The line is attached directly to the tip.

Whip – A short pole, normally 2 to 5 metres in length though can be up to 7 or 8 metres. Shorter whips are usually telescopic meaning the sections slide inside each other rather than having to be taken apart. Longer whips may be a combination of telescopic and take apart. Included in my definition is that a whip has a solid, flick tip. If it is elasticated then it is just a short pole or the top few sections of a longer one. Whips are used for speed fishing for smaller fish that generally do not require a landing net.

To Hand – A method normally associated with whip fishing in that the length of line attached to the tip is long enough for small fish to be swung “to hand” without having to reduce the length of the whip.

Olivette – Literally a small or tiny olive or egg shaped weight. Used when a large bulk is needed but the angler does not want a long string of shot on the line. There are two types, in line and pinned. The inline version, probably the most popular, is threaded onto the line using a hole through the long axis of the weight. It is then trapped in place using either a small shot above and below or by inserting a fine bristle into the hole. The pinned version has two protruding pins top and bottom and is attached like a float using two lengths of fine bore (silicone) tubing threaded on the line. Olivettes are used when a large bulk is required normally on heavy floats (over 1 gramme) in deep water. Made of tungsten they are heavy for their volume and thus sink quickly.

Skid Bung – A bung inserted into the final section on the pole in use to prevent damage when sliding the pole on the ground or through vegetation. It can also add some strength to the open end of the pole to prevent crushing.


Skid Bung

Roost – A device for storing topkits with rigs attached safely and within easy reach when not in use.  They can be free standing, mounted on bank sticks or attached to a seatbox. 
 
 
A pair of bankstick mounted roosts keeping my topkits safely off the snow.
 
Backshot - Shot placed on the line between float and pole tip.  These help steady the line and sink it out of any breeze.

Dropper Shot, Droppers - The shot nearest to the hook.   May be one, two or three small shot.